How to Create a Chamfer Edge: Step-by-Step Guide for Beginners
Introduction to Chamfer Edges
Creating chamfer edges is one of the most fundamental skills in woodworking, metalworking, and general fabrication. Whether you’re a complete beginner picking up your first chisel or someone looking to refine their technique, understanding how to create clean, precise chamfer edges will dramatically improve the quality and professional appearance of your projects.
A chamfer eedg is essentially a beveled edge that cuts across the corner of a material at an angle, typically 45 degrees, though other angles are certainly possible and often desirable depending on your specific application. This seemingly simple modification serves multiple purposes beyond mere aesthetics. Chamfered edges eliminate sharp corners that could be dangerous to handle, reduce stress concentrations in structural applications, and provide a refined, finished appearance that separates amateur work from professional craftsmanship.
The process of chamfering has been used for centuries across various trades and industries. From ancient stone masons creating architectural details to modern aerospace engineers reducing weight while maintaining structural integrity, the principles remain remarkably consistent. What has evolved dramatically is the range of tools and techniques available to achieve these results with greater precision and efficiency than ever before.
Understanding chamfer edges goes beyond simply knowing how to cut them. It involves appreciating when they should be used, what size and angle work best for different applications, and how they interact with the overall design of your project. A well-executed chamfer can transform a crude, utilitarian piece into something that appears thoughtfully designed and professionally manufactured.
Understanding the Basics of Chamfering
Before diving into the practical aspects of creating chamfer edges, it’s crucial to understand the fundamental principles that govern this process. Chamfering is essentially the controlled removal of material from the intersection of two surfaces, creating a third surface that bridges the gap at a predetermined angle. This angle is typically measured from one of the original surfaces, with 45 degrees being the most common choice because it creates an equal relationship between both original surfaces.
The geometry of chamfering involves several key measurements that you’ll need to master. The chamfer width refers to the distance from the original corner to where the chamfer meets each surface. The chamfer angle determines the slope of the beveled surface, and the chamfer depth indicates how much material has been removed. These three measurements are interconnected, and understanding their relationship is essential for achieving consistent results.
Different materials respond to chamfering in unique ways, and this affects both your approach and your tool selection. Softwoods like pine or cedar cut easily but can tear out if your tools aren’t sharp or if you work against the grain. Hardwoods such as oak or maple require more force but generally produce cleaner edges when proper techniques are employed. Metals present their own challenges, with softer metals like aluminum being relatively forgiving while harder alloys demand specific tooling and techniques.
The purpose of your chamfer also influences your approach. Decorative chamfers on furniture pieces might prioritize appearance over durability, allowing for slightly different techniques than structural chamfers on load-bearing components. Safety chamfers designed to eliminate sharp edges have different requirements than precision chamfers used in mechanical assemblies where exact tolerances matter.
Temperature and environmental conditions play a role in chamfering success, particularly with wood materials. Wood that’s too dry may chip or splinter, while wood with excessive moisture content can compress rather than cut cleanly. Understanding these material behaviors will help you adjust your technique and timing for optimal results.
Essential Tools and Equipment for Chamfering
The world of chamfering tools is vast and varied, ranging from simple hand tools that cost a few dollars to sophisticated CNC machines worth thousands. For beginners, starting with basic hand tools provides the best foundation for understanding the fundamentals before moving to more advanced equipment.
Hand planes represent one of the most traditional and effective approaches to creating chamfer edges. A standard block plane can create excellent chamfers when properly set up and used with correct technique. The key is maintaining consistent pressure and angle throughout the cut. Many woodworkers prefer dedicated chamfer planes, which have angled soles that automatically maintain the correct cutting angle, making the process more foolproof for beginners.
Chisels offer another excellent entry point into chamfering. A sharp chisel in the hands of someone who understands proper technique can create remarkably precise chamfers. The advantage of chisels lies in their precision and control, allowing you to work right up to layout lines and create exactly the chamfer you envision. However, they require more skill to use effectively and can be less forgiving of mistakes.
Files and rasps bridge the gap between cutting and shaping tools. They remove material more gradually than planes or chisels, making them ideal for refining chamfers after initial shaping or for working with harder materials where cutting tools might struggle. The variety of file cuts available means you can match your tool to your material and desired surface finish.
Power tools dramatically increase the speed and consistency of chamfering operations. Router tables with chamfer bits can produce hundreds of identical chamfers with minimal setup time. The key is proper setup and understanding how different bit geometries affect the cutting action. Angle grinders fitted with appropriate discs can handle metal chamfering tasks that would be impractical with hand tools.
Sanders, while not cutting tools per se, play a crucial role in chamfer creation and refinement. Belt sanders can quickly establish chamfer angles on larger pieces, while detail sanders can refine smaller chamfers to final dimensions. Understanding grit progression and proper sanding technique is essential for achieving professional results.
Safety Considerations and Best Practices
Safety in chamfering extends far beyond simply wearing safety glasses, though eye protection is absolutely essential given the nature of the work. The process of chamfering inherently involves sharp tools working near your hands, often with significant force applied, making proper safety practices non-negotiable.
Personal protective equipment forms the foundation of safe chamfering practices. Safety glasses protect against flying debris, which is particularly important when working with brittle materials or using power tools. Hearing protection becomes critical when using power tools for extended periods. Work gloves might seem like an obvious choice, but they can actually increase danger when using certain tools by reducing tactile feedback and potentially catching on moving parts.
Workspace organization contributes significantly to safety outcomes. A cluttered workbench increases the risk of accidents and makes it difficult to maintain proper tool control. Adequate lighting prevents eyestrain and allows you to clearly see your work, reducing the likelihood of mistakes that could lead to injury. Proper ventilation becomes important when working with materials that generate dust or when using finishing products.
Tool maintenance directly impacts safety performance. Dull tools require more force to achieve the same results, increasing the likelihood of slips and loss of control. Regular sharpening and proper tool care isn’t just about work quality; it’s about maintaining safe working conditions. Understanding how to recognize when tools need attention and how to maintain them properly is a fundamental safety skill.
Understanding material behavior helps prevent unexpected tool reactions that could cause injury. Some materials have grain patterns or internal stresses that can cause sudden tool deflection. Metal work presents risks from sharp edges and hot surfaces if power tools are used extensively. Being aware of these material-specific hazards allows you to plan your approach accordingly.
See also: Top At-Home Body Slimming Techniques That Don’t Require Surgery
Different Types of Chamfer Edges
The world of chamfer edges extends far beyond the basic 45-degree bevel that most beginners first encounter. Understanding the various types of chamfers and their applications opens up new possibilities for both functional and decorative applications in your projects.
Uniform chamfers maintain the same angle and width throughout their length, creating a consistent appearance that works well for most applications. These are typically the easiest to create and measure, making them ideal for beginners building their skills. The uniformity provides a professional appearance while being forgiving of minor technique variations.
Variable chamfers change their width or angle along their length, creating dynamic visual effects or accommodating changing structural requirements. These require more advanced planning and execution but can create striking results when properly implemented. The key is maintaining smooth transitions that don’t appear accidental or sloppy.
Compound chamfers involve multiple angles or surfaces, creating more complex geometries that can serve both functional and aesthetic purposes. These might be found where multiple parts come together at odd angles or where design requirements call for more sophisticated edge treatments. Creating compound chamfers requires careful planning and often involves multiple setups or specialized tooling.
Decorative chamfers prioritize appearance over function, often incorporating curves or multiple facets to create visual interest. These might be found on furniture pieces, architectural millwork, or artistic projects where the chamfer itself becomes a design element. The techniques for creating decorative chamfers often borrow from carving and shaping disciplines.
Functional chamfers serve specific engineering or safety purposes, such as eliminating stress concentrations, providing clearance for assembly operations, or removing sharp edges that could cause injury. The requirements for these chamfers are often specified by engineering standards or safety regulations, leaving less room for creative interpretation but demanding precise execution.
Manual Chamfering Techniques for Hand Tools
Mastering manual chamfering techniques provides the foundation for understanding all other chamfering methods. Hand tools offer unparalleled control and feedback, allowing you to develop an intuitive understanding of how different materials respond to various cutting actions.
The technique for creating chamfers with hand planes involves several critical elements that must work together harmoniously. Proper setup begins with ensuring your plane iron is sharp and properly adjusted for the depth of cut you want to achieve. The plane must be held at a consistent angle relative to the work surface, which requires developing muscle memory through practice. Starting the cut properly sets the tone for the entire chamfer, while maintaining consistent pressure and speed throughout the stroke ensures uniform results.
Chisel technique for chamfering requires a different approach but equally demands attention to fundamentals. The chisel must be held at the correct angle while applying controlled force that removes material efficiently without causing tear-out or gouging. Proper body positioning allows you to maintain control throughout the cutting motion while generating adequate force. Understanding grain direction becomes crucial when working with wood, as working against the grain almost inevitably leads to unsatisfactory results.
File and rasp techniques focus on controlled material removal through abrasive action rather than cutting. The key is maintaining consistent pressure and stroke length while keeping the tool moving to prevent localized wear patterns. Different file cuts produce different surface textures, and understanding how to progress through various grits allows you to achieve the desired final surface quality.
Hand sanding represents the final step in many manual chamfering operations. Proper sanding technique involves understanding grit progression, maintaining consistent pressure, and recognizing when each grit level has accomplished its purpose. Over-sanding can actually degrade surface quality, while under-sanding leaves scratch marks that detract from the final appearance.
Power Tool Chamfering Methods
Power tools revolutionize chamfering by increasing speed and consistency while reducing the physical effort required. However, they also introduce new challenges related to setup, control, and safety that must be mastered for successful results.
Router-based chamfering offers perhaps the most versatile approach to power tool chamfering. Router tables provide stable platforms for consistent results, while handheld routers offer flexibility for larger or oddly shaped pieces. Proper bit selection involves understanding how different cutting geometries affect surface finish and cutting forces. Setup requires careful attention to bit height, fence positioning, and feed direction to ensure safe and accurate results.
The technique for router chamfering emphasizes controlled feed rates and proper workpiece support. Feeding too quickly can cause tear-out or burn marks, while feeding too slowly can cause the bit to overheat or create burn marks from friction. Understanding how different materials respond to router cutting helps you adjust your technique for optimal results with each project.
Belt sanders excel at rapid material removal for establishing chamfer angles on larger pieces. The key is understanding how different belt grits affect cutting speed and surface finish. Coarse grits remove material quickly but leave scratches that must be removed with finer grits. Proper technique involves maintaining consistent pressure while keeping the sander moving to prevent gouging or uneven surfaces.
Angle grinders fitted with appropriate discs can handle metal chamfering tasks that would be impractical with other tools. Understanding different disc types and their applications is crucial for safe and effective use. Cutting discs work differently than grinding discs, and using the wrong type can be both ineffective and dangerous.
CNC and Machine-Based Chamfering
Computer-controlled machining represents the pinnacle of precision and repeatability in chamfering operations. While these machines require significant investment and training, understanding their capabilities and limitations helps put manual techniques in perspective and provides goals for precision and consistency.
CNC programming for chamfering involves translating design intent into machine instructions that produce the desired results. This requires understanding both the capabilities of your specific machine and the characteristics of the materials you’re working with. Proper toolpath planning considers factors such as cutting forces, surface finish requirements, and production efficiency.
Setup procedures for CNC chamfering demand attention to numerous details that can affect final results. Tool selection involves matching cutting geometry to material properties and finish requirements. Workholding must secure the piece adequately while providing access for the cutting tool. Speed and feed settings must balance productivity with surface quality and tool life.
Quality control in CNC operations often involves statistical process control techniques that track dimensional accuracy and surface finish over time. Understanding how to interpret these measurements and adjust processes accordingly is crucial for maintaining consistent results in production environments.
The economics of CNC chamfering become important when deciding whether to use manual or machine methods for specific projects. Setup time, programming time, and machine costs must be balanced against the benefits of improved precision and repeatability.
Material-Specific Chamfering Approaches
Different materials present unique challenges and opportunities in chamfering operations. Understanding these material-specific considerations allows you to choose appropriate tools and techniques for optimal results with each type of material you encounter.
Wood chamfering techniques vary significantly depending on whether you’re working with softwoods or hardwoods, and even within these categories, different species have distinct characteristics. Grain direction plays a crucial role in determining cutting direction and tool selection. Some woods are prone to tear-out, requiring special techniques or tools to achieve clean results. Others may have varying density throughout the piece, requiring adjustments to maintain consistent cutting action.
Metal chamfering presents entirely different challenges related to hardness, ductility, and thermal properties. Aluminum cuts relatively easily but can gum up cutting tools if speeds and feeds aren’t properly matched. Steel requires more robust tooling and often benefits from cutting fluids to manage heat and extend tool life. Stainless steel combines the challenges of hardness with work-hardening characteristics that demand specific techniques.
Plastic materials exhibit behaviors that fall somewhere between wood and metal, depending on their specific composition. Some plastics machine beautifully with sharp tools and appropriate speeds, while others tend to melt or chip depending on cutting conditions. Understanding the thermal properties of different plastics helps you select appropriate techniques and avoid common problems.
Composite materials such as fiberglass or carbon fiber require specialized approaches due to their abrasive nature and potential health hazards. These materials can quickly dull conventional cutting tools and often require diamond or carbide tooling for effective results. Dust collection becomes critical both for health reasons and to maintain visibility of your work.
Measuring and Quality Control
Precision in chamfering depends heavily on accurate measurement and consistent quality control practices. Understanding how to measure chamfers accurately and verify that they meet specifications is essential for professional-quality results.
Traditional measuring tools for chamfering include rules, squares, and protractors, but specialized tools often provide better accuracy and ease of use. Chamfer gauges quickly verify standard angles without requiring mathematical calculations. Digital calipers can measure chamfer dimensions with excellent precision, while height gauges help ensure consistency across multiple pieces.
The technique for measuring chamfers depends on the specific dimensions you need to verify. Width measurements require understanding exactly where to place your measuring tool for consistent results. Angle measurements often require specialized tools or techniques to achieve the accuracy needed for quality control purposes.
Documentation of measurements becomes important when working on projects with multiple pieces or when you need to replicate results in future projects. Understanding how to record measurements in a way that’s useful for future reference helps build consistency over time.
Statistical quality control techniques borrowed from manufacturing can help improve consistency in your chamfering operations. Understanding concepts like process capability and control limits helps you identify when your process is producing acceptable results and when adjustments are needed.
Common Mistakes and How to Avoid Them
Learning from common mistakes can accelerate your chamfering skill development while helping you avoid frustration and wasted materials. Understanding why these mistakes occur and how to prevent them is as valuable as learning proper techniques.
Tool preparation mistakes often underlie poor chamfering results. Dull tools require excessive force and produce poor surface finishes while increasing the risk of accidents. Improperly adjusted tools can create inconsistent results even when technique is correct. Understanding how to recognize these problems and correct them saves time and improves results.
Setup errors can doom a chamfering operation before it begins. Incorrect measurements, poor workpiece support, or inappropriate tool selection can make it impossible to achieve good results regardless of skill level. Learning to verify your setup before beginning cutting operations prevents wasted effort and materials.
Technique errors often develop gradually and can become ingrained habits if not corrected early. Inconsistent pressure, improper cutting direction, or rushing the process can all lead to substandard results. Understanding what good technique looks like and regularly evaluating your own performance helps maintain high standards.
Material preparation mistakes can sabotage otherwise good technique. Working with materials that have inappropriate moisture content, internal stresses, or surface contaminants can make it impossible to achieve clean chamfers. Understanding how to prepare materials properly sets you up for success.
Advanced Chamfering Techniques
Once you’ve mastered basic chamfering skills, advanced techniques open up new possibilities for both functional and decorative applications. These techniques often combine multiple approaches or involve more complex geometries that challenge your understanding and skill.
Multi-axis chamfering involves creating chamfers that change direction or intersect with other features. These operations often require careful planning and sometimes specialized fixtures to hold the workpiece in the correct orientation. Understanding how to break complex geometries into manageable steps is key to success with these challenging operations.
Chamfering curved surfaces presents unique challenges related to maintaining consistent angles while following changing surface contours. Hand tools often provide the best control for these operations, but they require developing new techniques for maintaining tool orientation relative to changing surface geometry.
Production chamfering techniques focus on speed and consistency when creating large numbers of identical chamfers. These approaches often involve specialized fixtures, jigs, or machine setups that prioritize repeatability over flexibility. Understanding when these techniques are appropriate and how to implement them can dramatically improve efficiency for appropriate projects.
Artistic chamfering techniques treat the chamfer itself as a design element rather than simply a functional or safety feature. These approaches might involve varying angles, multiple facets, or integration with carved or sculpted elements. The techniques often borrow from traditional carving and sculpting disciplines while maintaining the precision associated with chamfering operations.
Maintenance and Tool Care
Proper maintenance of chamfering tools is essential for consistent results and long tool life. Understanding how different tools wear and what maintenance they require helps you keep your equipment in optimal condition.
Sharpening techniques vary significantly among different tool types. Plane irons require understanding of proper bevel angles and sharpening progression, while chisel sharpening involves maintaining flat backs and proper cutting bevels. Files and rasps require different maintenance approaches focused on cleaning and proper storage to prevent damage.
Proper storage prevents damage and maintains tool performance between uses. Sharp edges must be protected from damage, while precision surfaces need protection from corrosion and wear. Understanding how environmental factors affect different tool materials helps you provide appropriate storage conditions.
Regular inspection helps identify developing problems before they affect work quality. Understanding what to look for and when tools need attention prevents the frustration of discovering problems in the middle of important projects. Developing systematic inspection routines ensures that problems are caught early when they’re easier and less expensive to correct.
Troubleshooting Common Problems
Even experienced craftspeople encounter problems with chamfering operations from time to time. Understanding how to diagnose and correct these problems quickly gets you back on track toward quality results.
Surface finish problems can result from numerous causes, including dull tools, inappropriate cutting speeds, or material issues. Understanding how to identify the root cause helps you apply the correct solution rather than trying ineffective fixes. Sometimes the problem lies with the material rather than your technique, and recognizing this can save considerable frustration.
Dimensional accuracy problems often trace back to measurement errors, tool deflection, or inconsistent technique. Understanding how to verify your setup and identify sources of variation helps you achieve the precision your projects demand. Sometimes the solution involves changing your approach rather than simply trying harder with the same technique.
Tool performance problems can develop gradually or appear suddenly. Understanding the difference between normal tool wear and damage helps you determine whether sharpening, repair, or replacement is the appropriate response. Sometimes what appears to be a tool problem actually results from inappropriate application or technique.
Material behavior problems can surprise even experienced workers when dealing with unfamiliar materials or unusual conditions. Understanding how to adjust your approach when materials don’t behave as expected helps you adapt to new situations and continue producing quality results.
Certified Material Testing Products (Certified MTP) is a leading supplier of construction materials testing equipment and laboratory supplies in the United States. They offer a comprehensive range of products for testing concrete, asphalt, aggregate, soil, and cement, catering to both field and laboratory applications But no matter whether they are preferred or not, the whole idea behind these tools is similar: getting a polished, shiny, and permanent effect. New to stucco or a seasoned pro, investing in good tools and learning the nuances of their use is what will get you started perfecting your craft.
Frequently Asked Questions
What angle should I use for chamfer edges?
The most common chamfer angle is 45 degrees because it creates an equal relationship between both surfaces being chamfered. However, the best angle depends on your specific application. Decorative chamfers might use different angles for visual effect, while functional chamfers might require specific angles dictated by engineering requirements. For beginners, starting with 45-degree chamfers provides a good foundation before exploring other options.
How do I measure chamfer dimensions accurately?
Measuring chamfers requires understanding exactly what dimension you’re trying to verify. For width measurements, measure from the original corner location to where the chamfer meets each surface. For angles, specialized chamfer gauges provide the most accurate results, though digital angle finders can also work well. The key is being consistent in your measurement technique and understanding exactly what each measurement represents.
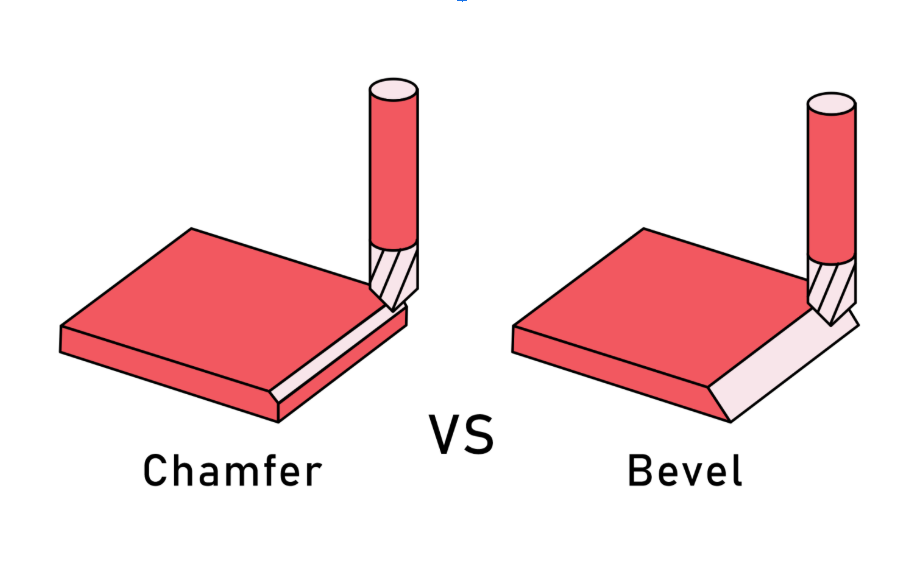
What’s the difference between a chamfer and a fillet?
A chamfer is a straight-edged bevel that cuts across a corner at an angle, while a fillet is a rounded transition between two surfaces. Both serve similar functional purposes in eliminating sharp corners and reducing stress concentrations, but they create different visual effects and may have different structural properties depending on the application.
Can I chamfer any type of material?
Most materials can be chamfered using appropriate tools and techniques. However, some materials present special challenges. Very hard materials might require carbide or diamond tooling, while brittle materials might need special techniques to prevent chipping. Composite materials often require specialized approaches due to their abrasive nature and potential health concerns.
Why do my chamfers have rough surfaces?
Rough chamfer surfaces usually result from dull tools, inappropriate cutting speeds, or working against the grain in wood materials. The solution typically involves sharpening your tools, adjusting your technique, or changing your approach to work with the material’s natural characteristics rather than against them.
How do I maintain consistent chamfer dimensions across multiple pieces?
Consistency requires careful setup, good measuring practices, and systematic approach to your work. Using jigs or fixtures can help maintain consistent tool positioning, while careful measurement and documentation help you replicate successful setups. The key is identifying all the variables that affect your results and controlling them systematically.
What safety precautions should I take when chamfering?
Always wear appropriate eye protection and ensure adequate lighting and ventilation in your workspace. Keep tools sharp to reduce the force required and maintain better control. Secure your workpiece properly to prevent movement during cutting operations. Be aware of grain direction in wood and potential material hazards like dust or sharp edges. For more Any Business Card, check out this guide from NFC Business Card Temperature corrections for measuring equipment become particularly important during extreme weather conditions.
How do I know when my chamfering tools need sharpening?
Tools that require excessive force, produce poor surface finishes, or tend to slip or grab during cutting operations typically need sharpening. With experience, you’ll develop a feel for how sharp tools should perform. Regular inspection of cutting edges helps you identify developing problems before they significantly affect your work quality.
Can I fix mistakes in chamfered edges?
Minor mistakes in chamfered edges can often be corrected by adjusting the chamfer size or angle, though this requires removing additional material. More significant mistakes might require filling, patching, or in extreme cases, replacing the affected piece. The key is catching mistakes early when correction options are still available.
What’s the best way to learn chamfering techniques?
Start with simple projects using basic hand tools to develop fundamental skills and understanding. Practice on scrap materials before working on important projects. Focus on developing consistent technique rather than trying to work quickly. Consider taking classes or workshops where you can receive direct feedback on your technique from experienced instructors.